In this tutorial we’re going to learn in detail about:
- How to do field validations using Zod.
- How to customize error messages.
- How to display validation errors.
We’re going to build a form that contains the following fields and requirements:
- Name: length between 2 - 10 characters.
- Email: must use valid email.
- website: must use valid url.
UI setup
We’re going to create a form containing labels and text fields using the good old <input /> element.
function App() {  return (    <form>      <div>        <label htmlFor="name">Name</label>        <input id="name" />      </div>
      <div>        <label htmlFor="email">Email</label>        <input id="email" />      </div>
      <div>        <label htmlFor="passengers">Website</label>        <input id="passengers" />      </div>
      <button type="submit">Submit</button>    </form>  );}
Define the form fields and validations
The next thing to do is to define our validations using Zod.
I like to define it in a separate file to make the code look clean.
import z from "zod";
export const formSchema = z.object({  name: z.string().min(2).max(10),
  email: z.string().email(),
  website: z.string().url(),});
/** * This is equivalent to * type Form = { *   name: string; *   email: string; *   website: string; * } */export type Form = z.TypeOf<typeof formSchema>;
Zod already provides us a way to do most common validations such as string length, email and url validation.
We also export a type from the schema that will be used in the next step.
export type Form = z.TypeOf<typeof formSchema>;Integrate schema validation into the form
We use the formSchema defined previously and create a hook that will handle everything else for us.
import { useForm } from "react-hook-form";import { Form, formSchema } from "./schema";import { zodResolver } from "@hookform/resolvers/zod";
function App() {  const {} = useForm<Form>({    resolver: zodResolver(formSchema),  });
  return (    <form>      {/* the rest of the UI */}    </form>  )}
The option resolver: zodResolver(formSchema) tells React Hook Form to use the field validations defined in formSchema.
Handle text field events
Now we want to inform React Hook Form whenever there are changes in the text field.
function App() {  const {    register  } = useForm<Form>({    resolver: zodResolver(formSchema),  });
  return (    <form>      <div>        <label htmlFor="name">Name</label>        <input id="name" {...register("name")} />      </div>
      <div>        <label htmlFor="email">Email</label>        <input id="email" {...register("email")} />      </div>
      <div>        <label htmlFor="passengers">Website</label>        <input id="passengers" {...register("website")} />      </div>
      <button type="submit">Submit</button>    </form>  );
register('email') means anything we do to that text field will affect the value of email field.
When we put the Form generic type into the useForm<Form>, we’re telling TypeScript to only accept fields defined in the Form type.
That means register('nonExistingField') will result in TypeScript compilation error.
Handling form submission
We need a way to capture all the validated form data so we can send it to the server for example.
For now we’ll just show the validated data in the console.
function App() {  const { register, handleSubmit } = useForm<Form>({    resolver: zodResolver(formSchema),  });
  return (    <form      onSubmit={handleSubmit((data) => {        console.log(data);      })}    >      {/* fields */}    </form>  );}
Now try inputting valid values to the field and see the result.
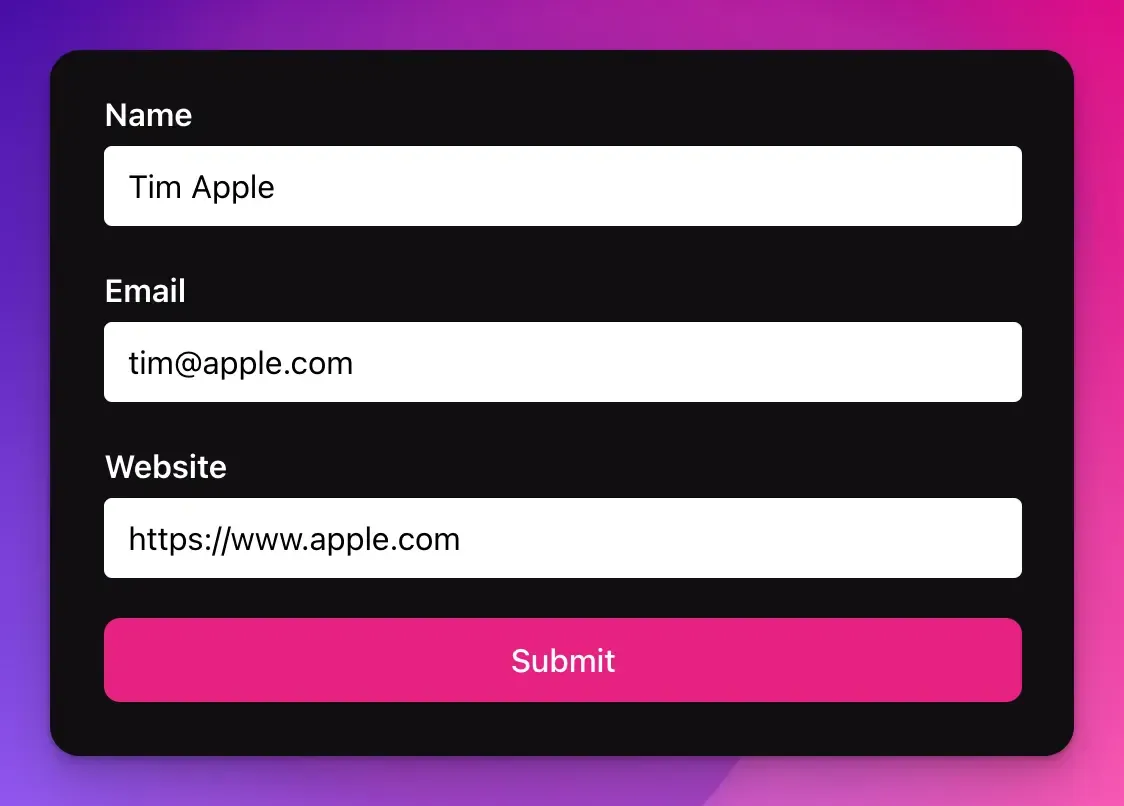
Object { name: "Tim Apple", email: "[email protected]", website: "https://www.apple.com"}Congratulations, now you get a working form, but not complete yet!
Display validation errors
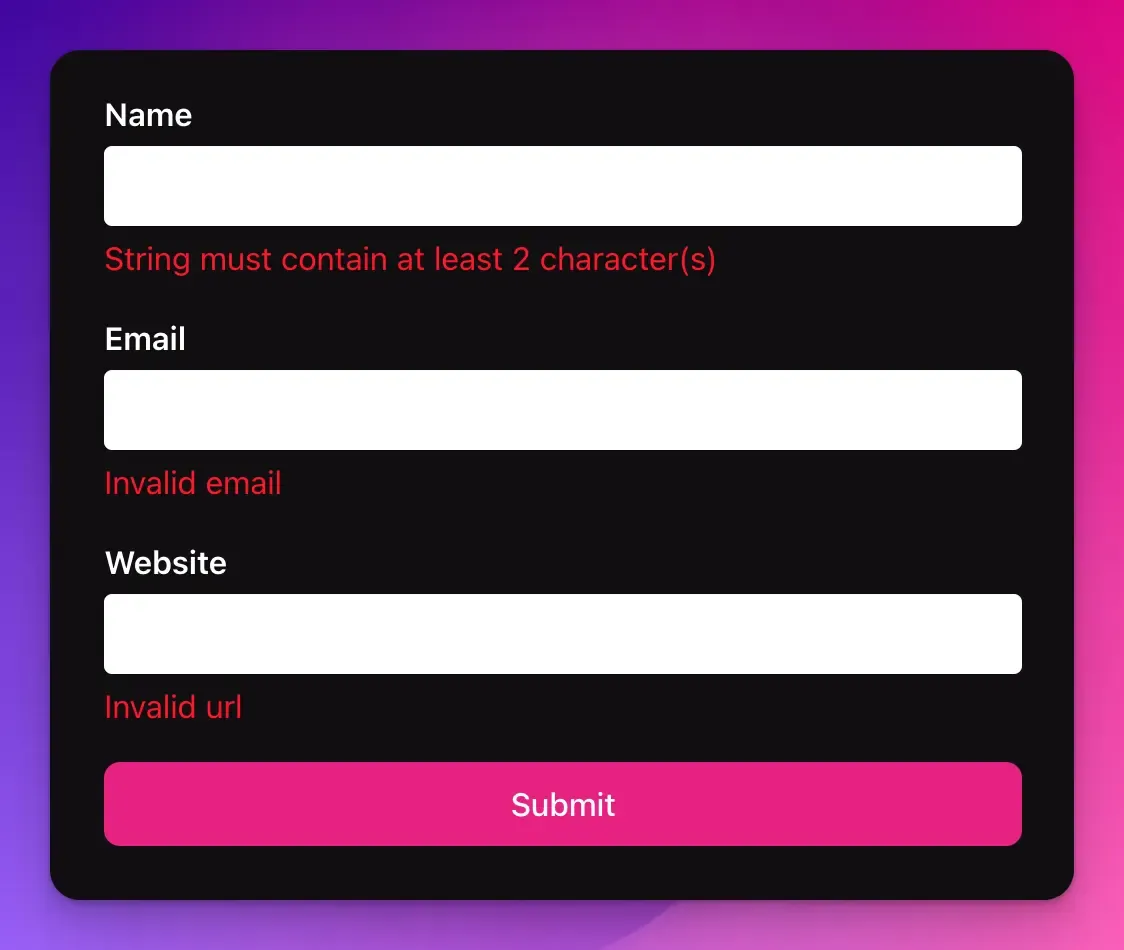
If you leave the form blank or put some invalid values, the form will not show any error message.
React Hook Form validates our input when we press “Submit” and stores the error messages.
It is our job to show the validation errors.
function App() {  const {    register,    formState: { errors },    handleSubmit,  } = useForm<Form>({    resolver: zodResolver(formSchema),  });
  return (    <form      onSubmit={handleSubmit((data) => {        console.log(data);      })}    >      <div className="field">        <label htmlFor="name">Name</label>        <input id="name" {...register("name")} />        <div className="error">{errors.name?.message}</div>      </div>
      <div className="field">        <label htmlFor="email">Email</label>        <input id="email" {...register("email")} />        <div className="error">{errors.email?.message}</div>      </div>
      <div className="field">        <label htmlFor="passengers">Website</label>        <input id="passengers" {...register("website")} />        <div className="error">{errors.website?.message}</div>      </div>
      <button type="submit">Submit</button>    </form>  );}
Now all the errors will show up on the screen.
Customize error messages
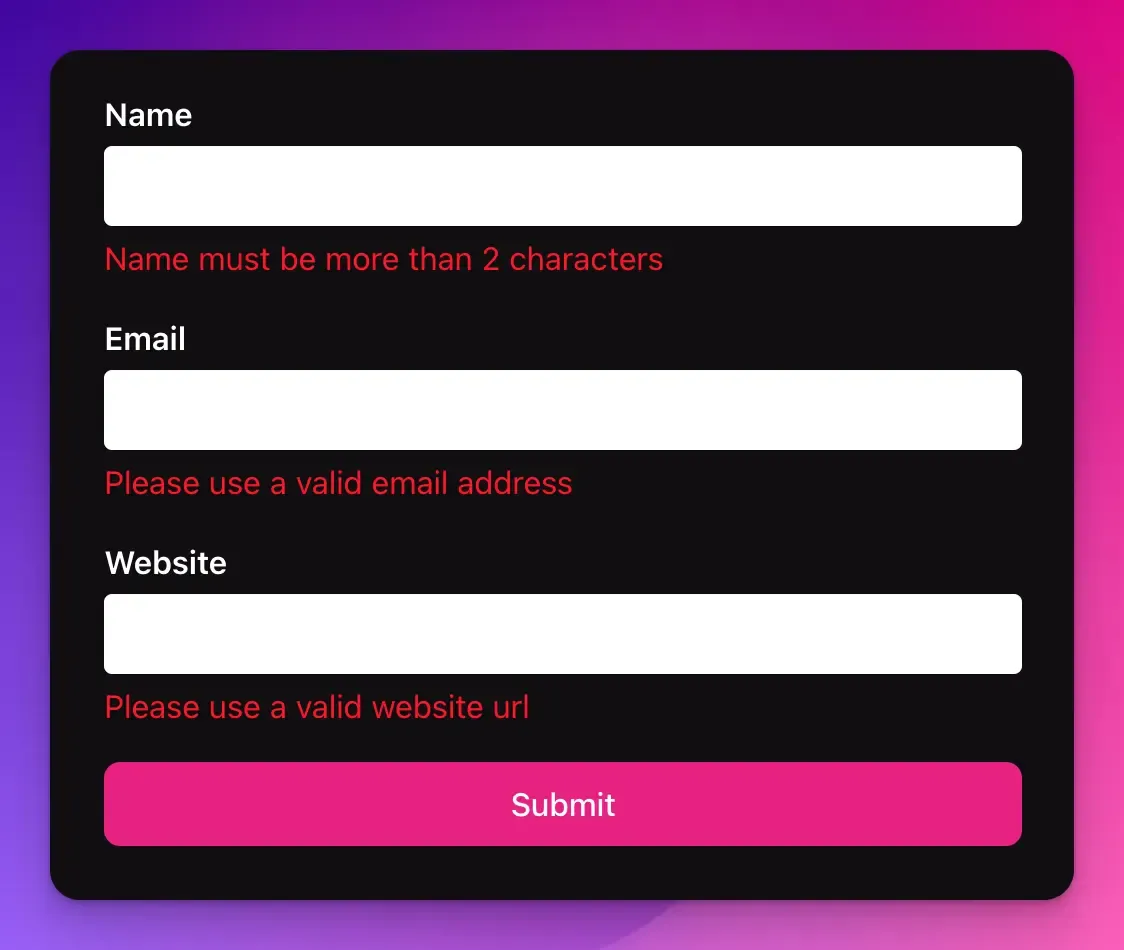
The error messages shown above are not the most user friendly ones.
My parents would think that getting the name right would involve something to do with guitars or violins.
Fortunately modifying error messages is simple, we only need to define them in each validation in the schema.
export const formSchema = z.object({  name: z    .string()    .min(2, "Name must be more than 2 characters")    .max(10, "Name must not be more than 10 characters"),
  email: z.string().email({ message: "Please use a valid email address" }),
  website: z.string().url({ message: "Please use a valid website url" }),});
Now try running the validations again, you’ll get a much more user friendly error messages.
Final result
The sandbox below summarizes this tutorial. Feel free to fork and try it out.